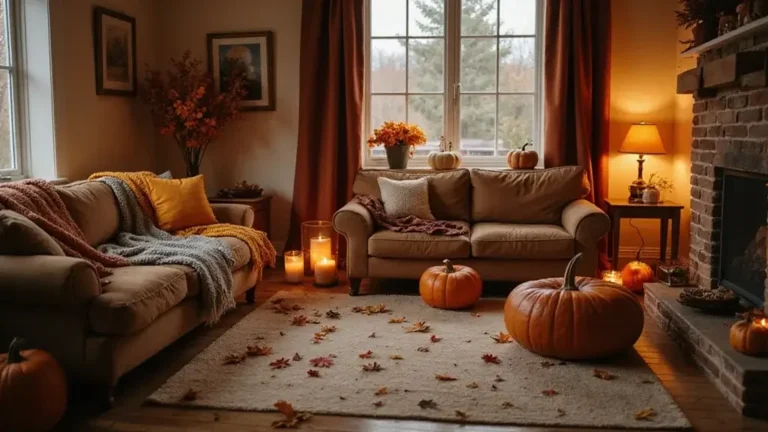
13 Indoor Halloween Decorations That Will Terrify Your Guests (In the Best Way Possible!)
I pulled together 13 indoor Halloween decorations that terrify in the best way. They’re easy, affordable, and quick to set up. You’ll find ideas like shadowy silhouettes on walls, glow accents that pop with dim lights, and fake cobwebs that look real from a doorway. They use simple materials—cardboard, fabric, string, tape, and a few lights—so you can start tonight.
Ready to get started? Keep reading for the full set of ideas and step by step tips. You’ll walk away with a plan you can use tonight or spread across the week before Halloween. By the end, you’ll terrify your guests in the best way—fun, memorable, and very doable.
1. Creepy Cobweb Curtains

If you want a spooky vibe fast, this is your go-to. Cobweb curtains are cheap and simple to set up. They fit any room and any theme.
What you need:
– Sheer black fabric or an old white sheet
– Scissors
– Tape or lightweight hooks
– Optional: plastic spiders and a string of LED lights
How to make the web look:
– Cut the fabric so it drapes in long, loose strands.
– Tug edges to fray and form thin threads.
– Pull pieces apart to create irregular, messy webs.
How to hang:
– Drape the curtain across doorways or in front of windows.
– Use tape or hooks to hold it in place. Let it catch a hint of light.
Light and mood:
– Place LED lights behind the curtain for a soft glow.
– White lights create a ghostly shimmer; color can set a playful or eerie tone.
Add the final touch:
– Scatter artificial spiders on the web.
– Pair with skeletons or bats to add depth.
Why this works for you:
– The look is dramatic without a big cost.
– It can be stored flat and reused every year.
Next steps:
– Start with one doorway, then expand to the room for a bigger effect.
Product Recommendations:
2. Ghostly Inflatable Figures
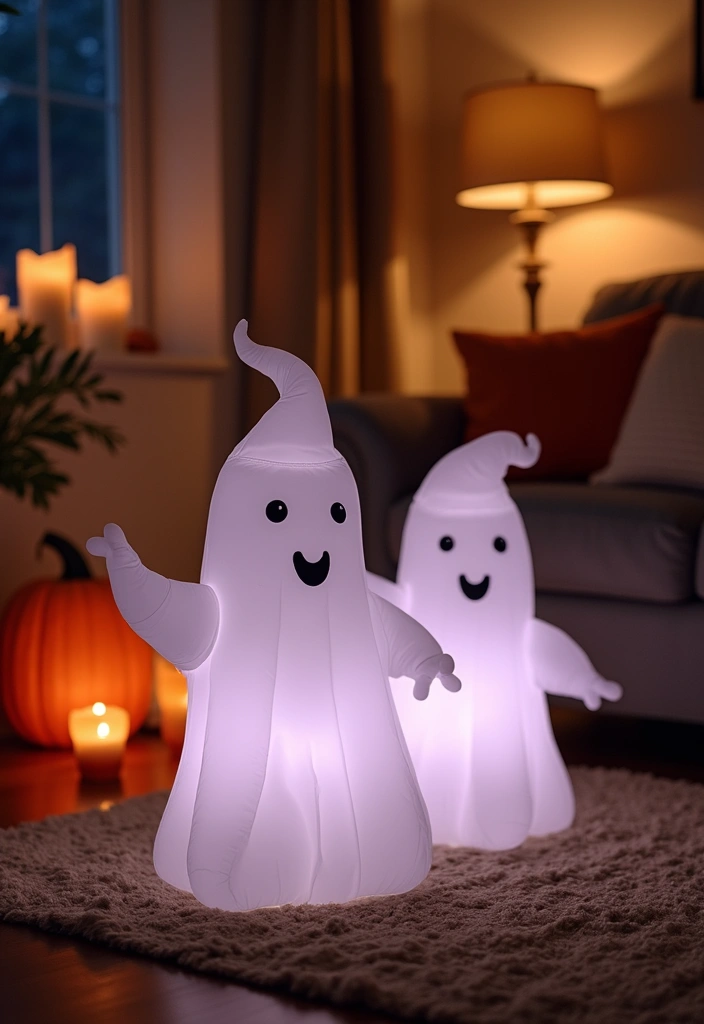
You want indoor Halloween decor that feels spooky but stays playful. Here is why ghostly inflatables work inside: they’re big, they’re bright, and they surprise guests as soon as they walk in.
– Big inflatables make a bold splash Choose tall figures that fill a corner or stand by the sofa. They draw the eye and set the mood fast.
– Place them in smart spots Put them in corners, near windows, or in the living room where people gather. A quick glance goes from friendly to eerie.
– Look for built‑in lights Tiny LED eyes or a soft glow inside add depth in dim rooms. They light up without extra lamps.
– Pair with a touch of fog A light mist around the figure adds a chill. Use a small fog machine or a safe alternative.
Here’s how to set them up safely.
– Secure them well Use weights or a non slip mat to keep them from tipping.
– Keep power cords out of walkways and away from paths.
– Create mood with lighting Dim the room a bit and let the inflatables do the rest.
Next steps: consider a timer so the glow starts at twilight and ends when guests head home.
With a few well placed inflatables, your home becomes a fun, spooky space that welcomes everyone.
Product Recommendations:
• Halloween Inflatable Yard Decorations
3. Chilling Candle Arrangements
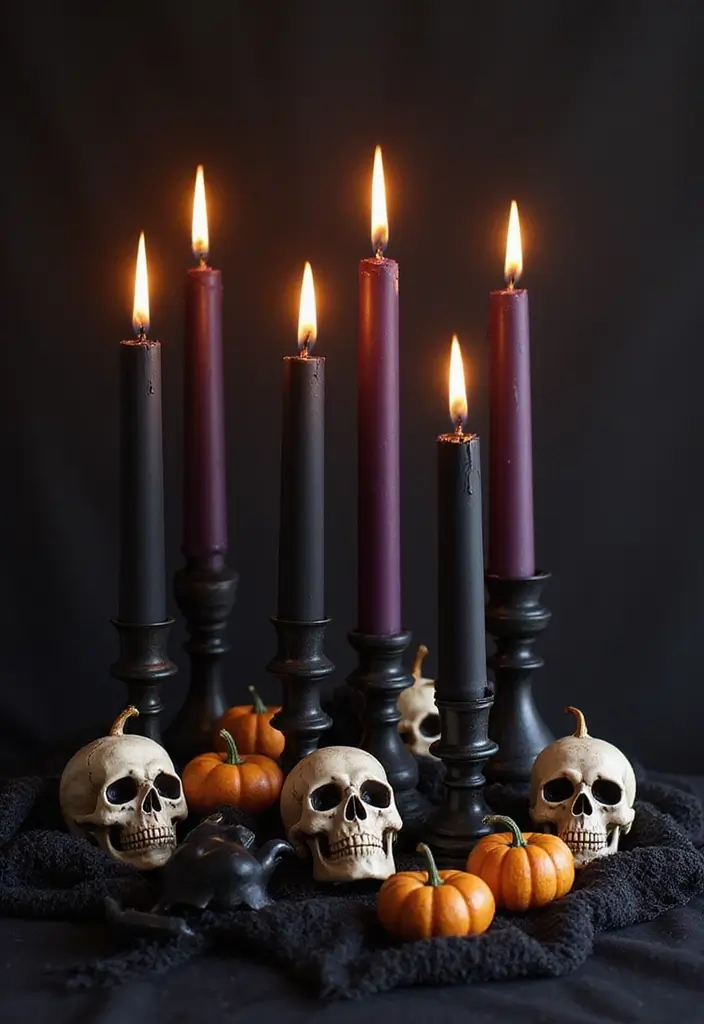
You want a spooky glow without danger. Candles can do that if you plan them right. Start with dark candles, black or deep purple. Place them on a decorative platter. Scatter faux skulls, moss, or small pumpkins nearby to build a moody scene. The setup draws the eye and the room fills with a chilly vibe.
For drama, choose drip candles that let wax run down and pool like slow streams. Keep them away from drapery and dry leaves. Safety tip: battery-operated candles give you the mood without fire or mess. Use these in busy rooms or on tables you touch often.
DIY Ideas
– Melt crayon wax onto regular candles to create a controlled drip look. Let the wax cool and run in natural lines.
– Nest the candles in jars or lanterns. This keeps the wax in place and adds a crafty touch.
– Layer light by using different heights. A few tall tapers with short votives create depth.
Placement and ambiance
– Set your display where guests will naturally look, like a coffee table or entry console.
– Add a soft, warm glow. Avoid overpowering light; you want texture and shadows.
– Keep safety in mind. Clear clutter and place candles away from fabrics.
A well-made candle display adds warmth and keeps the Halloween vibe intact.
Product Recommendations:
• Battery Operated LED Candles
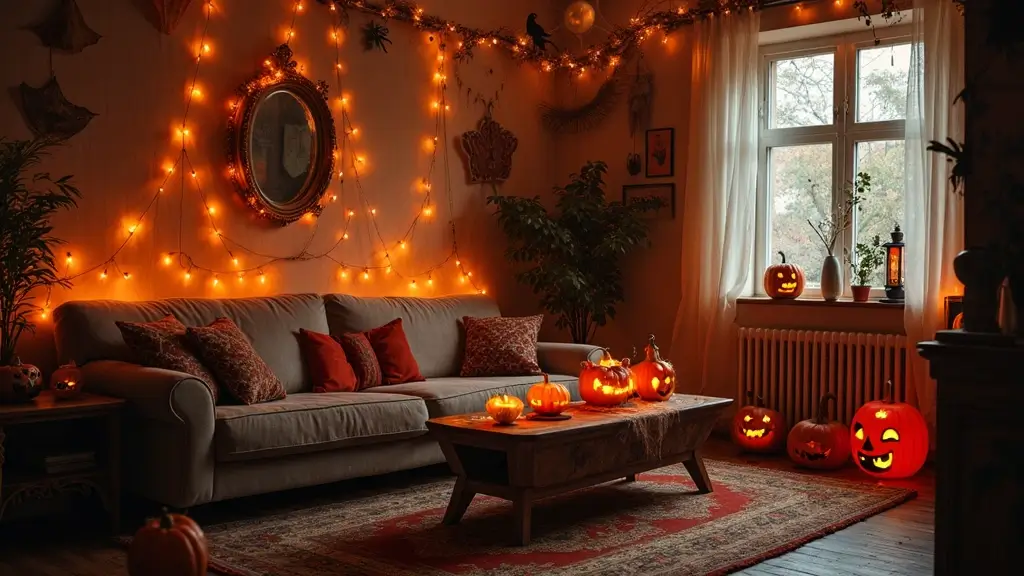
4. Sinister Silhouettes

Want a spooky vibe inside without spending a lot? Silhouettes deliver a bold look with little effort. You can use silhouette cutouts of bats, witches, ghosts, or creepy trees. Place them in windows or along walls so their shapes cast eerie shadows when a light shines behind them. It’s a staple of indoor Halloween decor.
DIY is easy. Cut your shapes from black poster board or sturdy cardboard. Mix sizes and jagged edges for a natural, night-scene feel. Attach the silhouettes to walls or the inside of windows with removable adhesive so you can switch them up later without damage.
Placement matters. Put silhouettes where they catch the eye as guests move through the room. In a window, line several pieces at different heights. Against a plain wall, stagger figures so they look like a crowd of shadow shapes.
Light makes them come alive. Backlight the cutouts with a lamp or a string of warm LEDs to deepen the glow. For extra depth, use two lights on opposite sides so the shadows overlap and feel larger than life.
– Light them from behind for a dramatic effect at night.
– Mix different shapes and sizes for visual interest.
This simple setup adds depth and a talking point for your guests.
Simple setup, major impact.
Product Recommendations:
5. Spooky String Lights
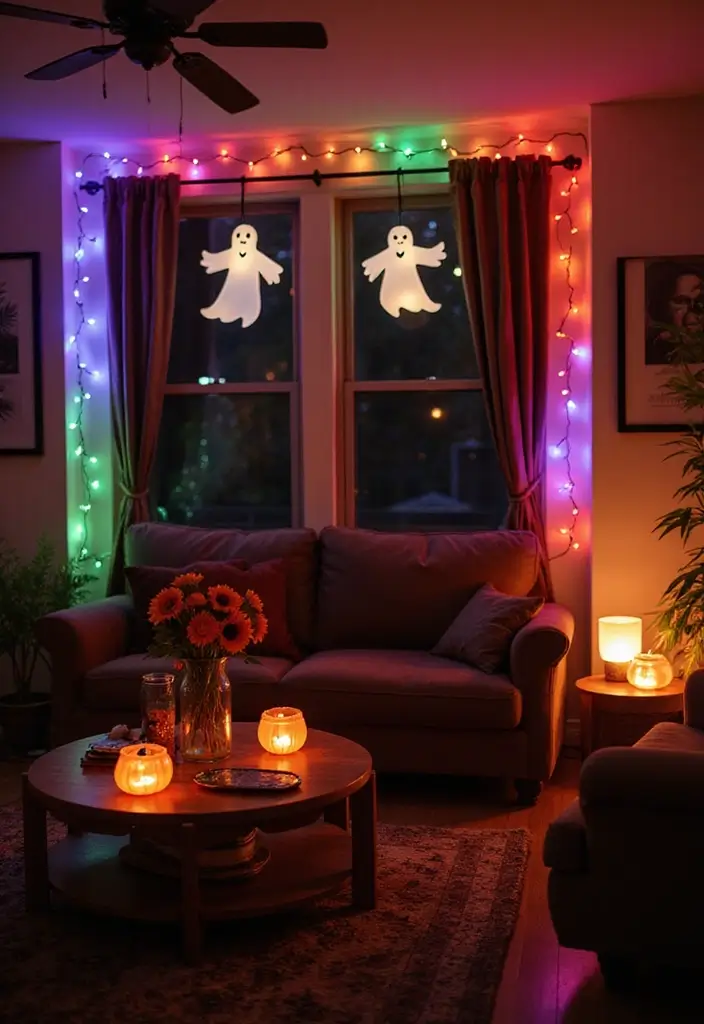
Spooky string lights can turn a plain room into a Halloween scene. Look for mini shapes like pumpkins, ghosts, or spiders. They give a soft glow without making the space feel loud.
Where to show them:
– drape them over furniture, along the edge of a mantle, or loop around door frames.
– you can also weave them through a bookshelf or hang them above an entryway.
They create a warm mood that is inviting for guests who might be a bit scared.
Materials and setup:
Use clear micro LED string lights for a clean look. Try lights with a warm white base and a few colored strands mixed in. This combo keeps things cozy while adding a playful twist.
DIY Tips:
– Use clear string lights and attach your own spooky charms for a personal touch.
– Mix warm and colored lights for a whimsical effect.
Why it works:
The twinkle adds depth to shadows and makes textures pop. It’s easy to rearrange if you want a quick update for different rooms or parties.
Next steps:
Pick a spot, place the lights, and test the effect from a chair or doorway. Adjust height and angle until the shapes sit just right.
Enjoy the glow.
Product Recommendations:
• Clear Micro LED String Lights
6. Haunted Portrait Gallery
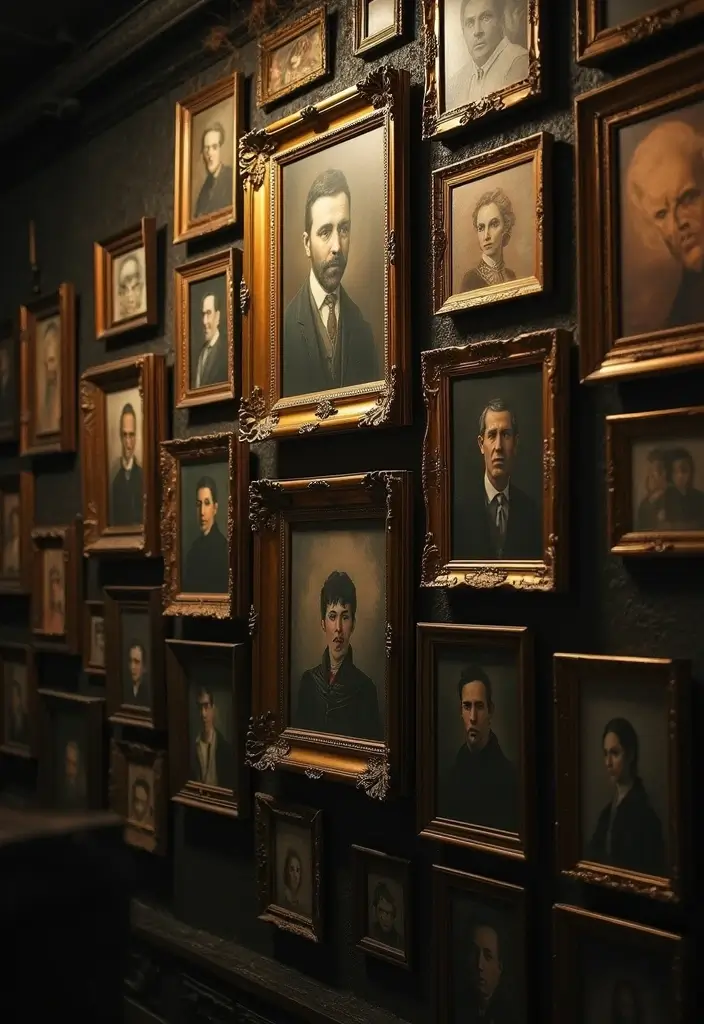
You want a creepy focal point that still feels classy. Here is why a haunted portrait wall works. It draws eyes, sets mood, and gives guests something to inspect. Let’s break it down step by step.
– Choose portraits with a ghostly vibe that makes people slow down.
– Pick Victorian portraits, moody landscapes, or old family photos with faded colors.
– Find printable vintage portraits online or edit your own photos.
– Desaturate colors, pale the faces, and add a soft glow.
– Frame them in dark fancy frames and mix tall, square, and small sizes.
– Hang the portraits in a neat grid or in cozy, irregular clusters.
– Leave space so each portrait has room to breathe.
– Dim the room and use a small spotlight for dramatic shadows.
– Add a flickering LED candle or string lights for mood.
– Vary frame sizes to create a subtle rhythm across the wall.
– Use warm light carefully so you keep detail in the faces.
– Clean the frames and portraits before hanging to look sharp.
Your guests will feel like they walked into a haunted museum. Next steps: gather prints, frames, and lights, then hang them in the chosen layout.
You might also like
12 Stylish Small Bedroom Makeovers
15 Stunning Front Porch Christmas Decor Ideas
Product Recommendations:
• Vintage-style picture frames
• photo editing software for vintage effects
7. DIY Spooktacular Centerpieces
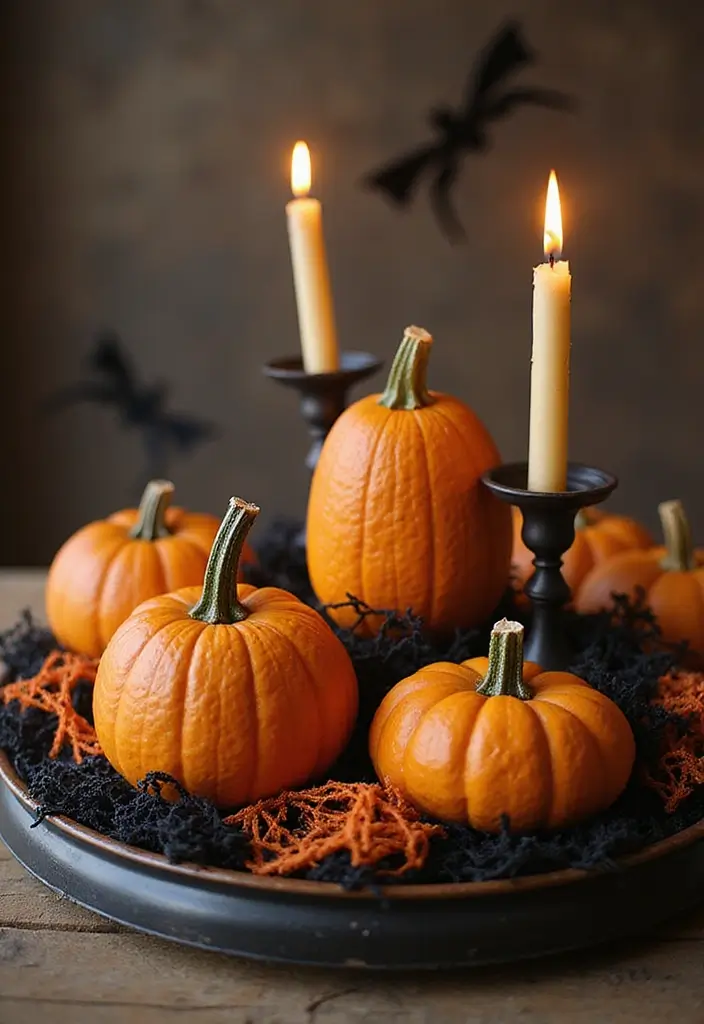
You want a centerpiece that sets the Halloween mood and starts chats at the table. A great DIY centerpiece can do both. It anchors your indoor Halloween decorations and feels easy to pull off.
Here is a simple plan that looks sharp and stays safe.
– Base it on a wide tray or shallow bowl.
– Line the tray with dark fabric, faux moss, or a velvet underlay.
– Arrange pumpkins and gourds in a low, spread-out pile.
– Tuck in faux spider webs to add texture.
– Add LED candles or a small string of battery lights.
– Include one spooky accent, like a tiny skeleton or a black bat figurine.
– Sprinkle a few glittery picks or glass beads for a subtle sparkle.
– Choose a simple color plan: orange and black with a touch of metallic or pale white.
Tricks for the Perfect Centerpiece:
– Keep it low-profile so it doesn’t block sight lines.
– Pick colors that pop against your table setting.
A well-made centerpiece sparks conversation, shows your style, and makes your Halloween table feel complete.
Product Recommendations:
• decorative tray for centerpieces
8. Gory Bathroom Touches
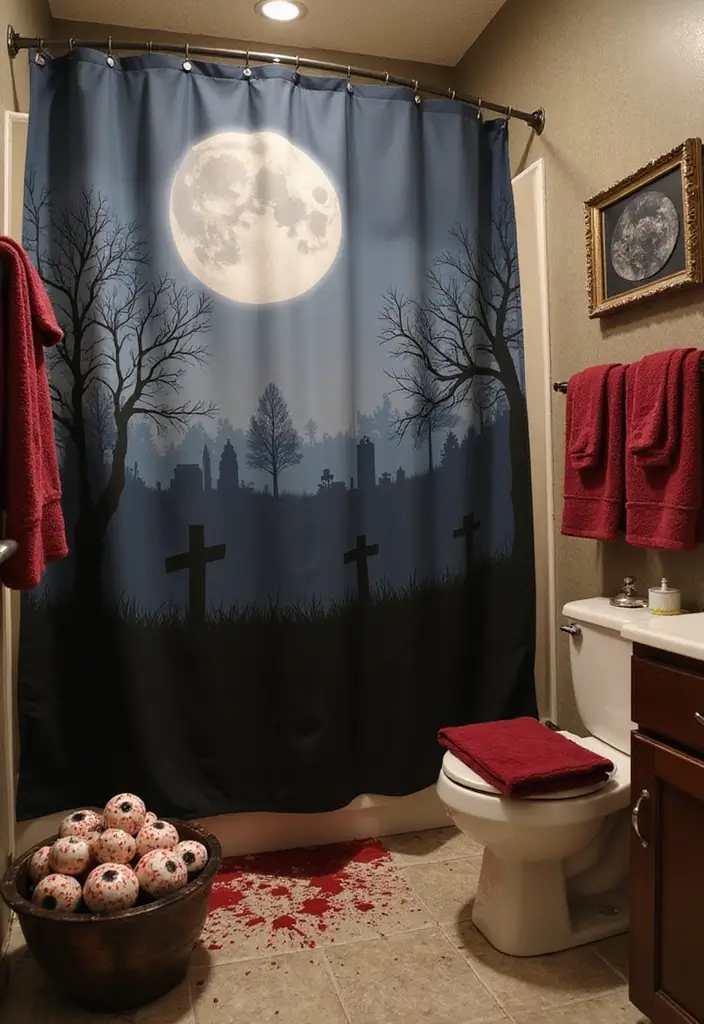
Your guests will use the bathroom during the night. A few simple touches can give a real chill without going over the top. You aim for a hint of fright that surprises, not scares away. Here is a quick plan that works.
– Bloody hand towels on the rack add a subtle, creepy feel that’s easy to pull off with no mess.
– Spooky shower curtain can appear threatening when you close the door. Choose dark prints or a design that hints at shadows.
– Graveyard bath mat or one with a tombstone pattern helps the scene set as soon as you step in.
– DIY towel quotes with fabric markers give a personal touch. Draw small quotes or images that mix humor with a hint of horror.
– Funny yet eerie accents like a bowl containing fake teeth or eyeballs create a moment of surprise at a glance.
For a quick upgrade, try a simple label makeover. Put creepy names on soap dispensers, such as “Witch’s Brew.” Tiny details like this pull the whole theme together.
These small additions turn your bathroom into a haunted retreat that guests remember long after the night ends. Keep the space safe and easy to use for guests after they finish.
Product Recommendations:
• Spooky Shower Curtain with Graveyard Design
• Decorative Bowl of Fake Eyeballs
9. Scary Science Experiments
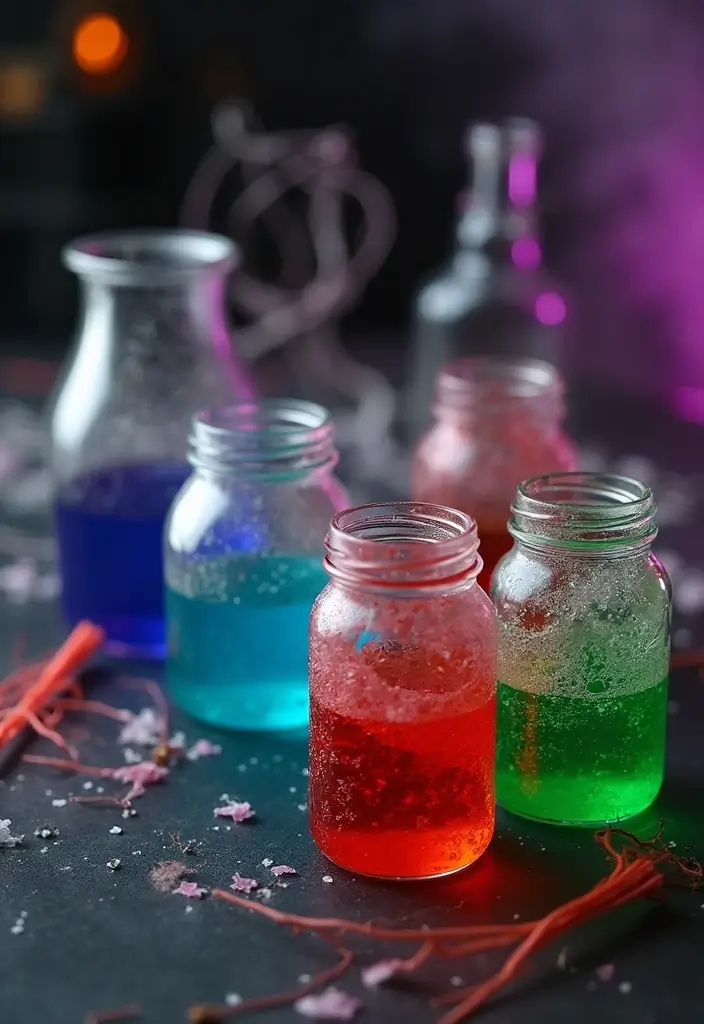
You want a lab vibe that thrills without a mess. Here is a safe, family friendly way to do it.
– Mad scientist jars: Clear glass jars, colored water, and fake eyes float inside. Label each jar with eerie names like “Zombie Serum” or “Spectral Brew.” A splash of glow dye makes them glow. Keep lids secure but easy to open.
– Fogging potions: Use a shallow dish with warm water and a small piece of dry ice. The fog rolls over the table. It feels magical, yet safe if you follow the rules. Add captions to explain what’s happening.
– Learning touchpoints: Add one quick note per jar. Explain color meaning or why bubbles rise in plain words. This turns decor into a mini science lesson and sparks questions.
Display tips: place jars on a dark table, spaced so guests can read without crowding. A low red or purple light deepens the mood and softens glare. Guests can admire, read, and chat.
Safety first: adults should handle dry ice away from small hands. Set jars on a sturdy tray, away from edges.
Next steps: gather jars, safe eyes, coloring, glow dye, dry ice, and a shallow tray.
You’ll get a wow moment that feels smart and fun.
Product Recommendations:
• dry ice
10. Terrifying Table Settings
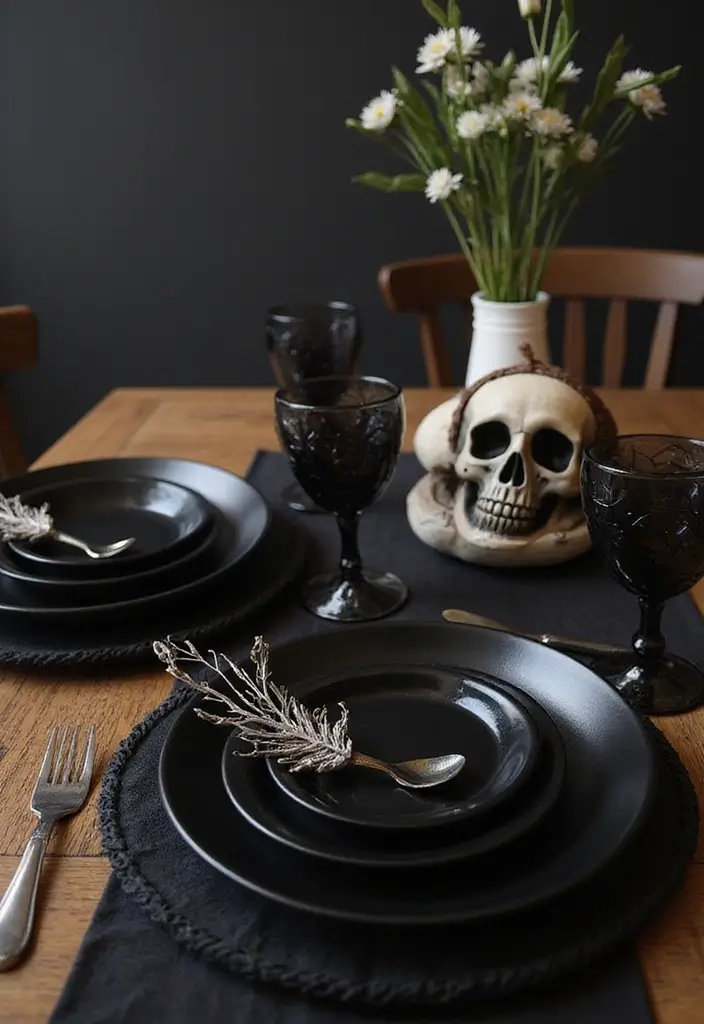
Terrifying Table Settings
You want a table that chills guests without scaring them away. You can get this with simple swaps and smart setup. Here is how to build a memorable fright at the center of your home.
– Bold tableware. Choose deep black plates. Use skull-shaped glasses that clink softly. Pick napkins with ghost prints that rise from the laps like a spooky breeze.
– Low, dramatic centerpiece. Place faux bones or spooky gourds in the middle. Drape fake spider webs along the table edge and tuck them under plates so they don’t block sight lines. Use LED candles for a soft, wavering glow.
– Edible decorations. Set gummy worms on dessert plates. Add a chocolate spider or candy eyes for a quick fright that guests can eat.
– Metallic accents. A hint of copper or silver on rims, napkin rings, or small figurines catches light and adds a chic gloom.
– Smart layout. Leave space for elbows and plates. Keep tall pieces low enough to let you see faces across the table. Align decorations so guests can pass dishes easily.
– Practical tips. Do a quick test before guests arrive. Light the table softly and use non-slip mats under all dishes.
Next steps: set up in about 20 minutes, adjust height, and snap a quick photo for a spooky post. Your meal will feel like a ghoul feast.
Product Recommendations:
• Halloween Spider Web Table Runner
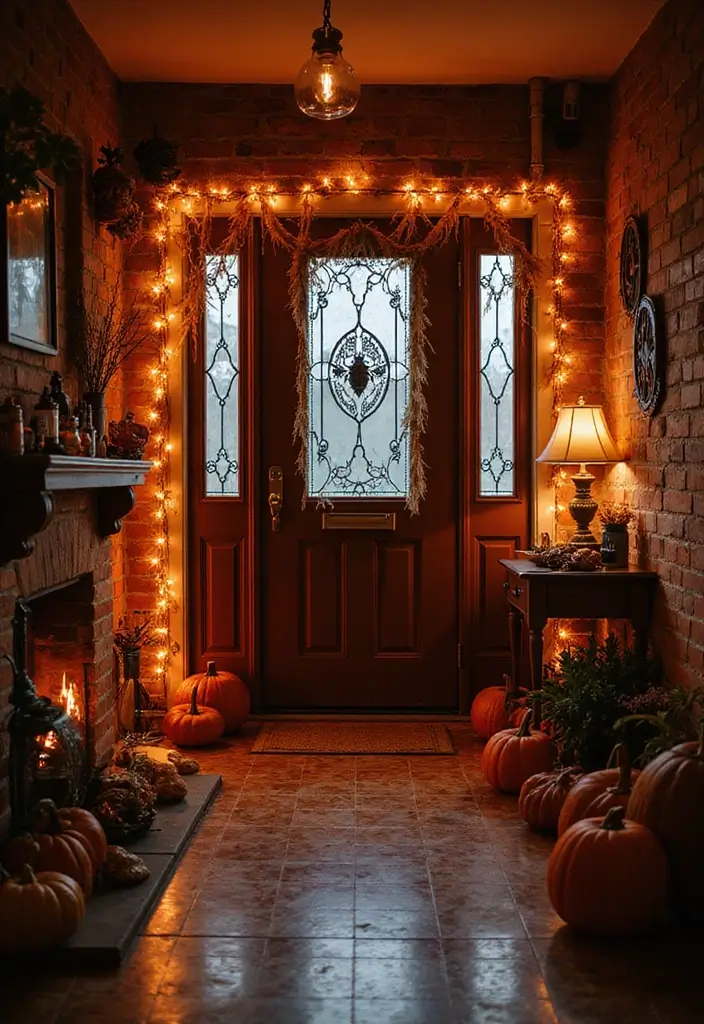
11. Haunted House Entryway

You want a haunted entry that grabs every guest the moment they step inside. A strong entrance sets the tone for the night. Start with a focal point that draws the eye and invites a closer look.
– Put an old chair or a small table at the doorway. Let it hold your spookiest decor.
– Display jack-o’-lanterns, a faux skeleton, dusty cobwebs, and a hint of fog in the air.
– Add mood lighting. Lanterns, flickering LED lights, or a single warm bulb behind a sheer curtain cast eerie shadows.
For Success:
– Use a spooky doormat that welcomes visitors with a twist.
– Create a “Beware” sign or a playful warning to spark curiosity.
– Keep paths clear so guests can enter safely without tripping on props.
Here is why this works: the eye lands on a scene, then the light plays tricks on it. Next steps are simple, fast, and effective.
Next steps: tweak your setup as you see guests arrive. Rotate pumpkins, skeletons, and props to keep the scene fresh. Test the lighting at dusk to see how it reads from the street. Remember safety first, and you will scare without tripping.
Product Recommendations:
12. Witchy Wreaths
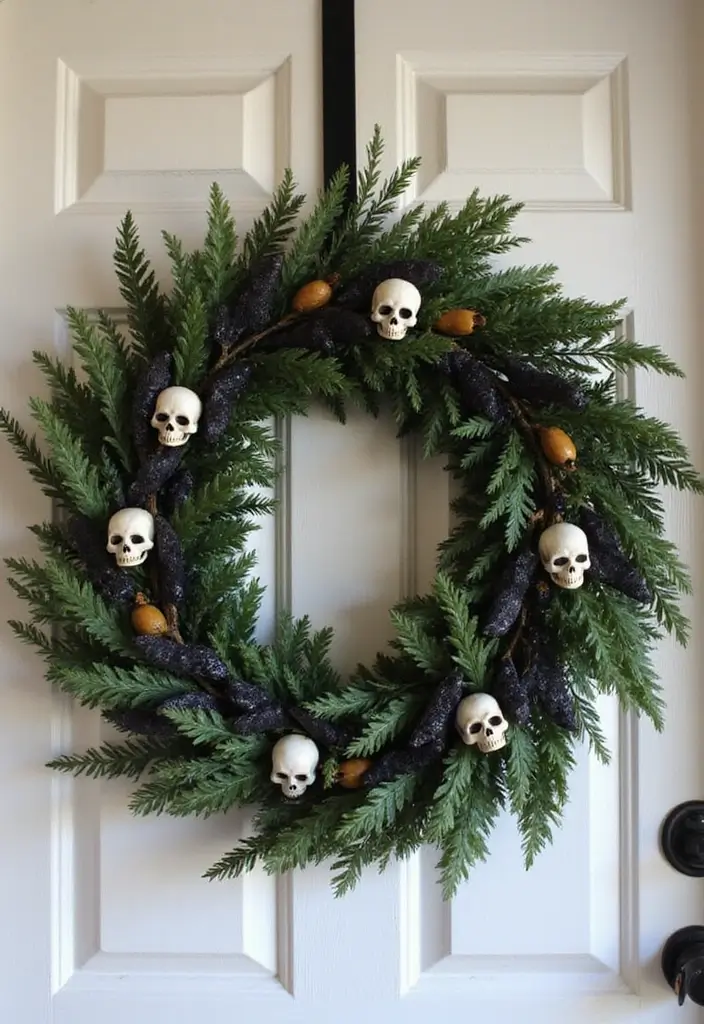
You want a wreath that fits Halloween mood. A witchy wreath does that. It welcomes guests and ties your theme together. It works indoors or on your front door. Here is why it works: it adds a dash of spooky charm without shouting. Let’s break it down. Next, this plan is simple, fast, and DIY friendly.
Materials
– Foam or twig wreath base
– Dark or black foliage, faux ivy, or dried leaves
– Black ribbon or garland
– Spooky accents like mini skulls, tiny bats, lace, or dried flowers
– Optional orange or purple lights and a banner with a spooky message
– Hot glue, floral wire, scissors
DIY steps
– Start with the base. If it’s foam, wrap it in a dark ribbon.
– Layer the foliage to cover the ring. Push pieces in at odd angles for a wild look.
– Attach accents with hot glue or wire. Space items unevenly for a natural creep.
– Add lights if you want a glow at night. Use low-watt indoor lights to stay safe.
– Finish with a banner or a few dangling charms for extra drama.
Style ideas
– Go all black for a sleek, modern vibe.
– Mix dried flowers for an earthy, witchy feel.
– Add a small mirror or crystal to catch light.
Placement tips
– Hang on the front door to greet guests.
– If indoors, put it over a fireplace or on a wall to anchor your Halloween scene.
Next steps: step back, adjust balance, and enjoy the spooky welcome you created.
Product Recommendations:
13. Spooktacular Wall Hangings
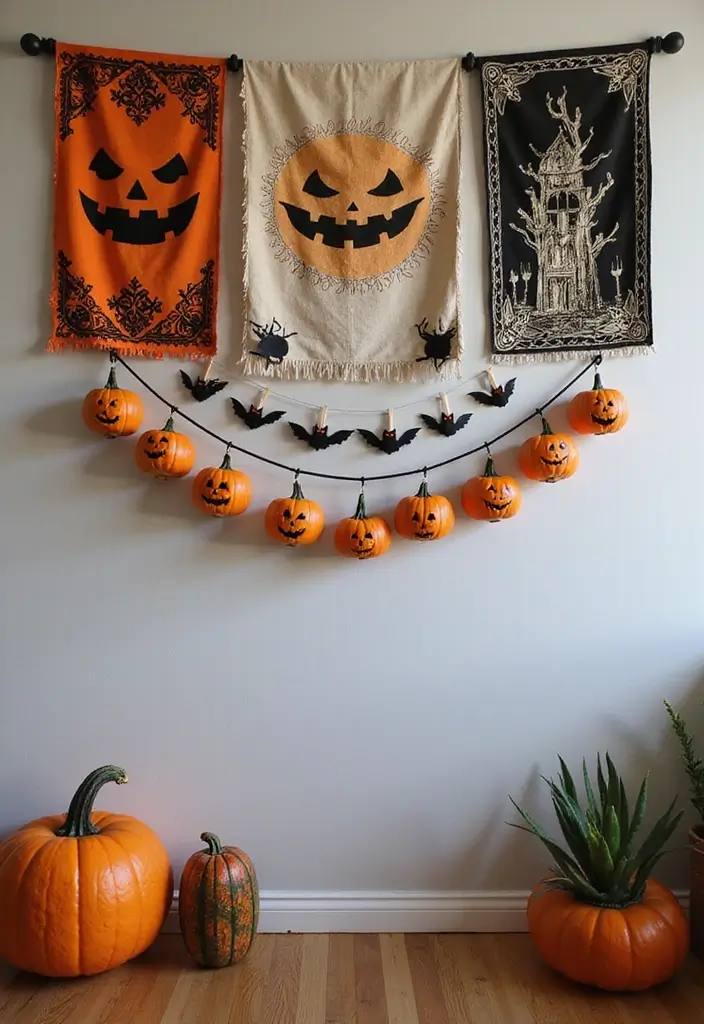
Walls set the first mood of your Halloween look. If you miss them, you miss a big chance to wow your guests. With the right wall hangings, the room feels alive with fright and fun the moment they walk in.
Spooktacular wall hangings\n\n
Here is why wall art matters. Choose tapestries that show a haunted forest, a witch gathering, or a moonlit graveyard. Look for lightweight fabrics or canvas that you can hang easily. Pick a color story of orange, black, and muted purple to keep everything tied together.
DIY Halloween garland\n\n
Make a garland from pumpkins, bats, and ghosts cut from sturdy paper or felt. Thread them with twine or a clear string. Drape it across a wall or suspend it from the ceiling for a floating, eerie effect. Play with sizes to add rhythm and movement.
– Layer wall hangings for depth
– Use different textures like fabric, paper, and felt
– Place larger pieces toward the back and smaller pieces in front
– Keep colors coordinated for a cohesive look
Removable hooks for easy changes\n\n
Go with removable hooks or command strips. They let you swap in new pieces after the season without leaving marks. This keeps your options open for next year.
Make your walls tell a story\n\n
Let your displays flow from room to room. Start with a cobweb corner, add a silhouette by a doorway, and finish with a bright garland near the stairs. A simple story on the walls makes your home feel like a cozy, spooky haunt.
Next steps: gather a few wall pieces, plan a color scheme, and test placements before you hang. Your walls will do more than decorate they will invite your guests into your Halloween mood.
Product Recommendations:
• Halloween Tapestry Wall Hanging
• Felt Pumpkin and Bat Garland
Conclusion about Indoor Halloween Decorations
Creating an indoor Halloween wonderland is all about mixing fun, fright, and creativity. Embrace these spooky ideas to transform your home into a space that leaves a lasting impression on your guests.
The best part? These decorations can be tailored to fit any aesthetic, from elegant to whimsical. Get crafty, add your personal touch, and let the Halloween spirit take over your home!
Indoor Halloween Decorations Frequently Asked Questions
What Are Some Easy DIY Ideas for Indoor Halloween Decorations?
There are plenty of fun and simple DIY ideas to create spooky indoor Halloween decorations! You can try making sinister silhouettes using black cardstock to cut out shapes like bats and ghosts. Another idea is to create haunted portrait galleries by printing eerie images and framing them. For a cozy atmosphere, consider chilling candle arrangements with dark candles and decorative platters. The best part? These projects require minimal effort and can be done on a budget!
How Can I Create a Spooky Atmosphere Without Breaking the Bank?
Creating a spooky atmosphere for Halloween doesn’t have to cost a fortune! Opt for creepy cobweb curtains made from sheer black fabric, which are both affordable and easy to set up. Use spooky string lights to add a magical glow—look for ones shaped like pumpkins or ghosts. You can also incorporate gory bathroom touches with inexpensive props. Combining these elements can transform your home into a frightful wonderland without emptying your wallet!
What Are Some Unique Indoor Halloween Decorations to Impress My Guests?
Impress your guests with unique indoor Halloween decorations like ghostly inflatable figures that surprise everyone as they walk in. A haunted house entryway can also set the tone right from the start—think pumpkins and spooky signage. For a classy yet creepy vibe, try a haunted portrait gallery featuring vintage-style frames. These decorations will definitely leave a lasting impression and spark conversations at your Halloween gathering!
How Do I Choose the Right Indoor Halloween Decorations for My Home Theme?
Choosing the right indoor Halloween decorations can be a fun process! Start by determining the overall theme you want to create—whether it’s playful and whimsical or dark and eerie. You can mix elements like witchy wreaths and spooky string lights to tie the theme together. Consider using DIY spooktacular centerpieces that reflect your chosen theme, making sure to keep consistency throughout your decorations for a cohesive look.
What Are Some Tips for Safely Incorporating Candles into My Halloween Decor?
Candles can add a warm, spooky glow to your Halloween decorations, but safety is key! Use chilling candle arrangements with dark candles placed on stable surfaces away from flammable materials. Opt for LED candles if you’re concerned about fire hazards. Additionally, scatter faux spider webs or other decorations around them to enhance the spooky effect while keeping everything safe. Always supervise lit candles, especially in high-traffic areas where guests will be mingling!